WordPress is very popular blog writing platform like blogspot provided by google.
In this first article, I am going to include my experience that I could successfully install WordPress in Kubernetes in my own server which is located in my home network.
I have my own blog in google and posting some technical articles. Google is giving a very good platform for bloggers, but I want to better manage my contents . Therefore I decided to install WordPress server in my server computer and make it accessible worldwide using Cloudflare tunneling. I can edit and post from anywhere.
We can install WP in the server directly, but I prefer using docker container and managed by Kubernetes. Kubernetes is a very popular container orchestration system where we can deploy containers and Kubernetes takes care of managing the running containers.
Lets Start!
I have a server computer (mini PC from NUC) which runs 24 hours a day. I have installed docker and k3d which is a lightweight wrapper to run k3s (Rancher Lab’s minimal Kuberetes distribution) in docker.
So, basically we write deployment and service files to install in Kubernetes. Basically, the deployment file will run pods and service file exposes the service to outside world.
Before installation of wordpress, we need to install mysql. Therefore, I have written deployment and service files to install MySQL.
mysql-deployment.yaml
apiVersion: apps/v1
kind: Deployment
metadata:
  name: mysql-deployment
spec:
  replicas: 1
  selector:
    matchLabels:
      app: mysql
  template:
    metadata:
      labels:
        app: mysql
    spec:
      containers:
        - name: mysql
          image: mysql:5.7
          env:
            - name: MYSQL_RANDOM_ROOT_PASSWORD
              value: '1'
            - name: MYSQL_DATABASE
              value: 'XXXXXX'
            - name: MYSQL_USER
              value: 'XXXXXXX'
            - name: MYSQL_PASSWORD
              value: 'XXXXXX'
          ports:
            - containerPort: 3306
          resources:
            limits:
              memory: "512Mi"
              cpu: "500m"
          volumeMounts:
           - mountPath: /var/lib/mysql
             name: wordpress-mysql-data
      volumes:
        - name: wordpress-mysql-data
          hostPath:
            path: /wordpress/mysql
            type: DirectoryOrCreate
        #  emptyDir: {}

---
apiVersion: v1
kind: Service
metadata:
  name: mysql-service
spec:
  selector:
    app: mysql
  ports:
    - protocol: TCP
      port: 3306
  type: NodePort
Creating deployment and service is done using kubectl command.
kubectl apply -f mysql-deployment.yamlSimilarly, I have writte the deployment and config file for wordpress.
wordpress-deployment.yaml
apiVersion: apps/v1
kind: Deployment
metadata:
  name: wordpress-deployment
spec:
  replicas: 1
  selector:
    matchLabels:
      app: wordpress
  template:
    metadata:
      labels:
        app: wordpress
    spec:
      containers:
        - name: wordpress
          image: wordpress
          env:
            - name: WORDPRESS_DB_HOST
              value: 'mysql-service'
            - name: WORDPRESS_DB_NAME
              value: 'XXXXXX'
            - name: WORDPRESS_DB_USER
              value: 'XXXXXX'
            - name: WORDPRESS_DB_PASSWORD
              value: 'XXXXXX'
          ports:
            - containerPort: 80
          resources:
            limits:
              memory: "512Mi"
              cpu: "500m"
          volumeMounts:
            - mountPath: /var/www/html
              name: wordpress-data
      volumes:
        - name: wordpress-data
          hostPath:
            path: /wordpress/wordpress
            type: DirectoryOrCreate
          #emptyDir: {}
---
apiVersion: v1
kind: Service
metadata:
  name: wordpress-service
spec:
  selector:
    app: wordpress
  ports:
    - protocol: TCP
      port: 80
  type: NodePort
Note: the WORDPRESS_DB_NAME, WORDPRESS_DB_USER, & WORDPRESS_DB_PASSWORD should be same from the MySQL configuration above.
Apply this configuration, we will have deployment and service for WP running!
Now, I want to make this blog accessible from outside. For that, I have created a public hostname with my domain from Cloudflare (blog.kpaudel.com.np).
Accessing this URL should point to the WordPress service. So, I have written the following configuration to access it from outside.
apiVersion: networking.k8s.io/v1
kind: Ingress
metadata:
  name: wordpress-ingress
  namespace: default
spec:
  rules:
  - host: blog.kpaudel.com.np
    http:
      paths:
        - path: /
          pathType: Prefix
          backend:
            service:
              name: wordpress-service
              port:
                number: 80
  - host: blog.kpaudel.lab
    http:
      paths:
        - path: /
          pathType: Prefix
          backend:
            service:
              name: wordpress-service
              port:
                number: 80
So, wordpress is accessible from URLs: blog.kpaudel.com.np (public), & blog.kpaudel.lab (accessible from homelab).
After WP is made live, we need to complete the required settings. So far so good. I am happy, and starting writing some sample blog. After I have done writing, tried to save the post. Unfortunately, I could not save it. I got some problem like “Could not save, seems like you are offline”. When I looked into the error message in browser inspection console, it was something related to mixing up http and https. The request from client to cloudflare is https and the request from cloudflare to WP server is http.
It took almost one month to fix the problem. The fix was not to difficult at the end. I could fix it by installing a plugin called “SSL Insecure Content Fixer”

After installlation and activating the plugin, I just went to Settings and selected the following:
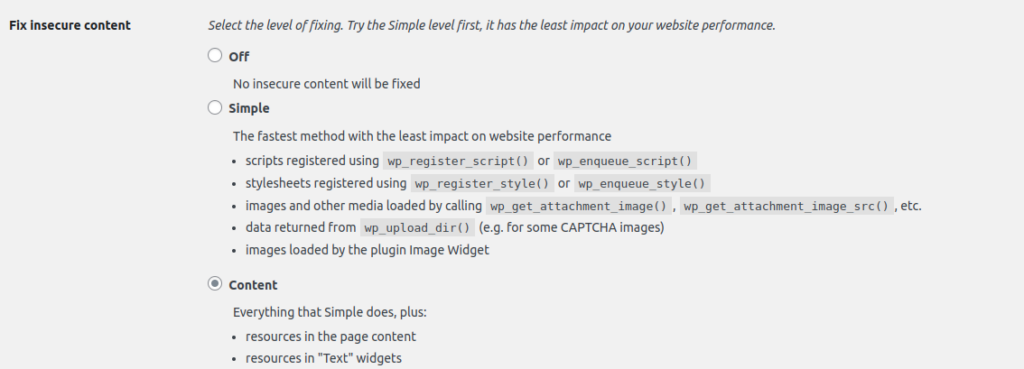

Thats it! Now I could save my sample posts. After successul testing, this is the first blog.
I will continue posting my expericence in this blog. You guys will mostly find mostly technical posts because my field is related to software development.
I will share my hobby projects and interesting stuffs.
This article is helpful. I could successfully install WordPress in Kubernetes, which guarantees no downtime.